Module 2 Book: Optimizing the Organization of a Moodle Course
| Site: | TRU Open Courses |
| Course: | Inclusive Digital Design Course (Enrolment Key: IDD) |
| Book: | Module 2 Book: Optimizing the Organization of a Moodle Course |
| Printed by: | Guest user |
| Date: | Tuesday, 14 July 2026, 1:01 AM |
Module 2 Overview
Please note: The principles from this module can be applied to any Learning Management System if your institution doesn't use Moodle.
Learning Outcomes
By the end of this module, you will be able to:
-
Identify course organization practices that enhance navigation
-
Explain how organization and navigation practices in a Moodle course impact the student learning experience
Topics
This module will cover the following topics:
-
Topic 1: Course Menu
-
Topic 2: Home Page
-
Topic 3: Course Content
-
Topic 4: Assessments
Introduction
An online presence for in-person courses is becoming more of an expectation from students these days. By providing course materials online, it creates a more inclusive and accessible learning environment since materials can be accessed outside of the classroom - anytime, anywhere, and at the students’ own pace.
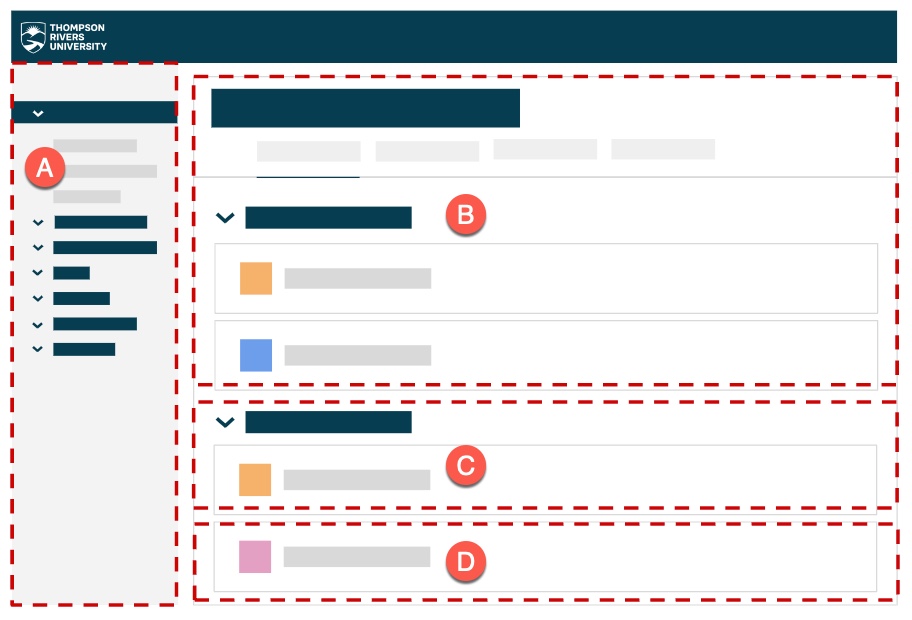
Specific accessibility practices to implement within Moodle are explored in Module 1: Formatting Course Content so it's Accessible. This module focuses on strategies for organizing and presenting your course elements to create an easy-to-navigate Moodle course for your students. It is organized into four main elements of a Moodle course:
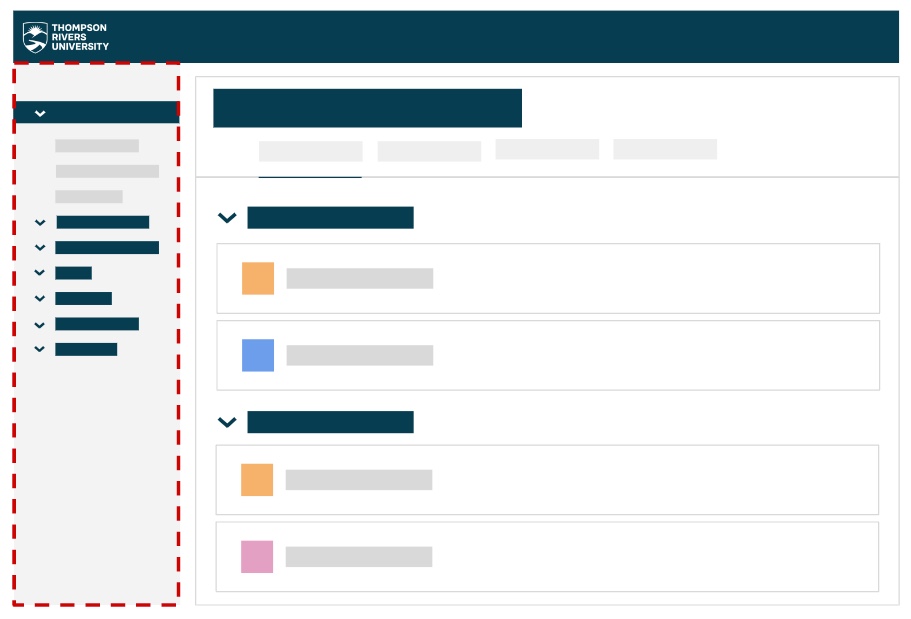
A. Course Menu
B. Home Page
C. Course Content
D. Assessments
Topic 1: Course Menu
In order to decide what your course menu in Moodle will consist of, an organized structure for your overall course needs to be determined first. In doing so, it helps students understand the big picture of the learning process, manage their time, and reduce anxiety (Nilson & Goodson, 2018, p. 40).
This topic focuses on three aspects of course menus in Moodle:
- Plan: Course Structure
- Design: Moodle Course Formats
- Name: Course Sections
Plan: Course Structure
Once you've planned your course content, activities, and assessments considering constructive alignment, now it is time to determine how to make your plan come to life in Moodle. To determine your Moodle course structure, questions you may ask yourself are: How do I want to organize my course sections (weeks, modules, topics, etc.)? What structure makes the most sense for this course content? What course content exists in each section? What assessments exist in each section?
Engaging in a planning exercise can be helpful to answer these kinds of questions and figure out the best way to structure your Moodle course. You may consider:
-
Making an hierarchical outline on a piece of paper
-
Creating a table that organizes your course by weeks, topics, or modules
-
Developing a concept map of the course structure
-
Making notes on slips of paper that can be rearranged
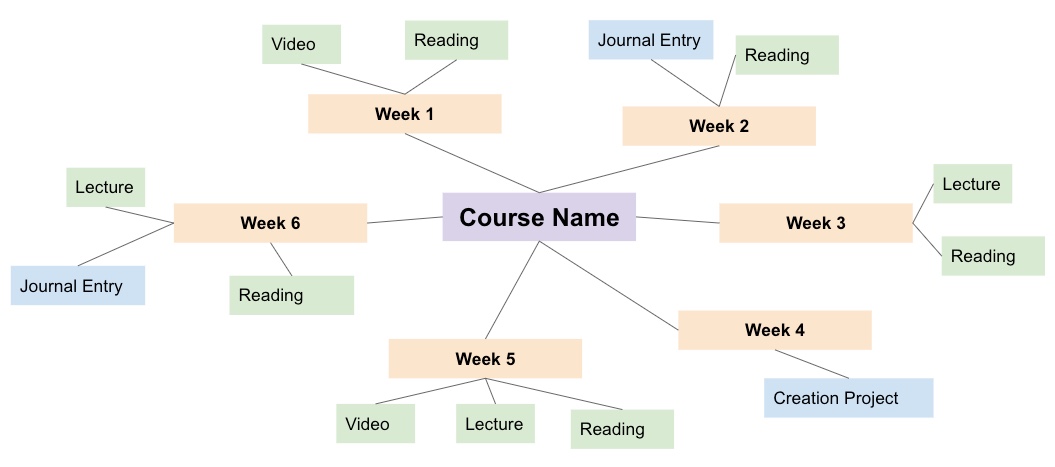
To help you visualize what these planning exercises may look like, here’s a basic example of a concept map. You can begin to see certain pieces of content and assessments being placed within each week:
Or, if you prefer working in tables, a framework for this kind of brainstorming may look something like this:

Challenge!
Take a scrap piece of paper and begin to conceptualize (in the format of your choice) how your Moodle course could be organized. This can even be for 1 or 2 sections/weeks for now, just to begin thinking about how your resources, learning activities, and assessments exist in each section of your course.For existing Moodle courses, it may be valuable to write your current course structure on paper to see it from a new perspective. Then, you can determine if that organization strategy is clear or perhaps you might want to explore some different options!
Design: Moodle Course Formats
Once you have a general sense of how you want to structure your course, you will need to determine which Moodle course format style will compliment your structure the best.
In Moodle, there are a variety of course organization styles to choose from. The most common ones are:
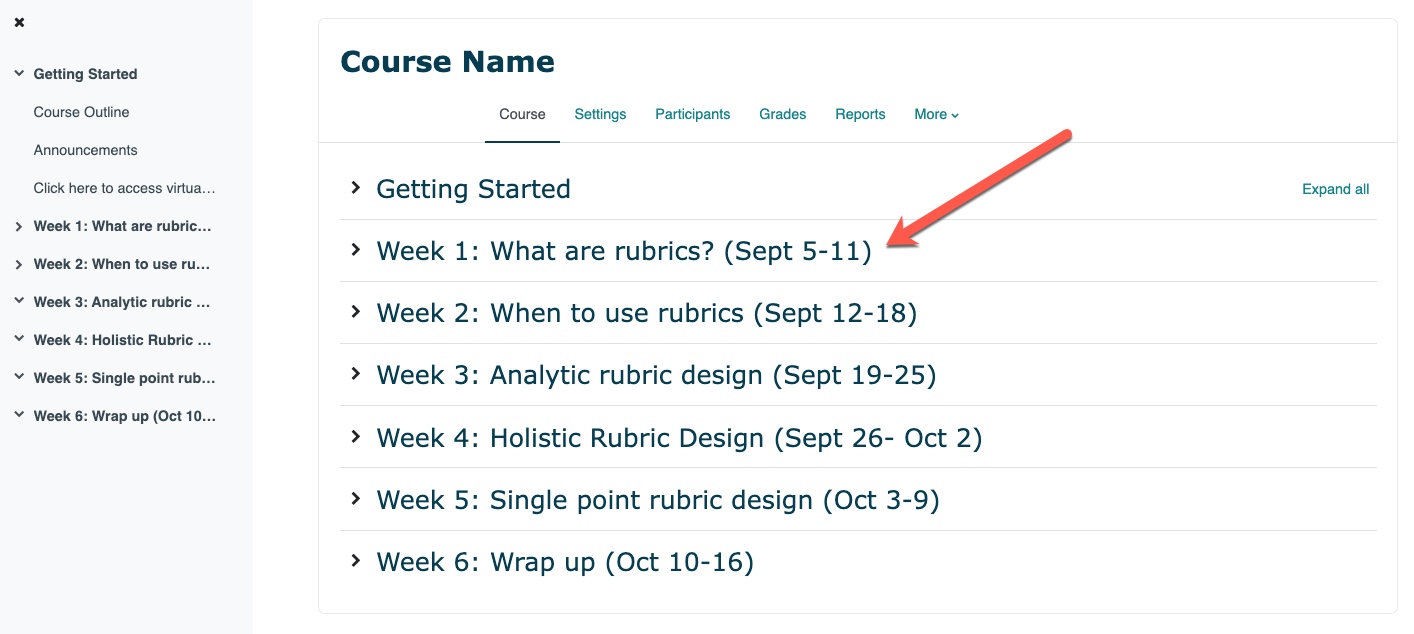
Weekly Course Format:
Topics Course Format:

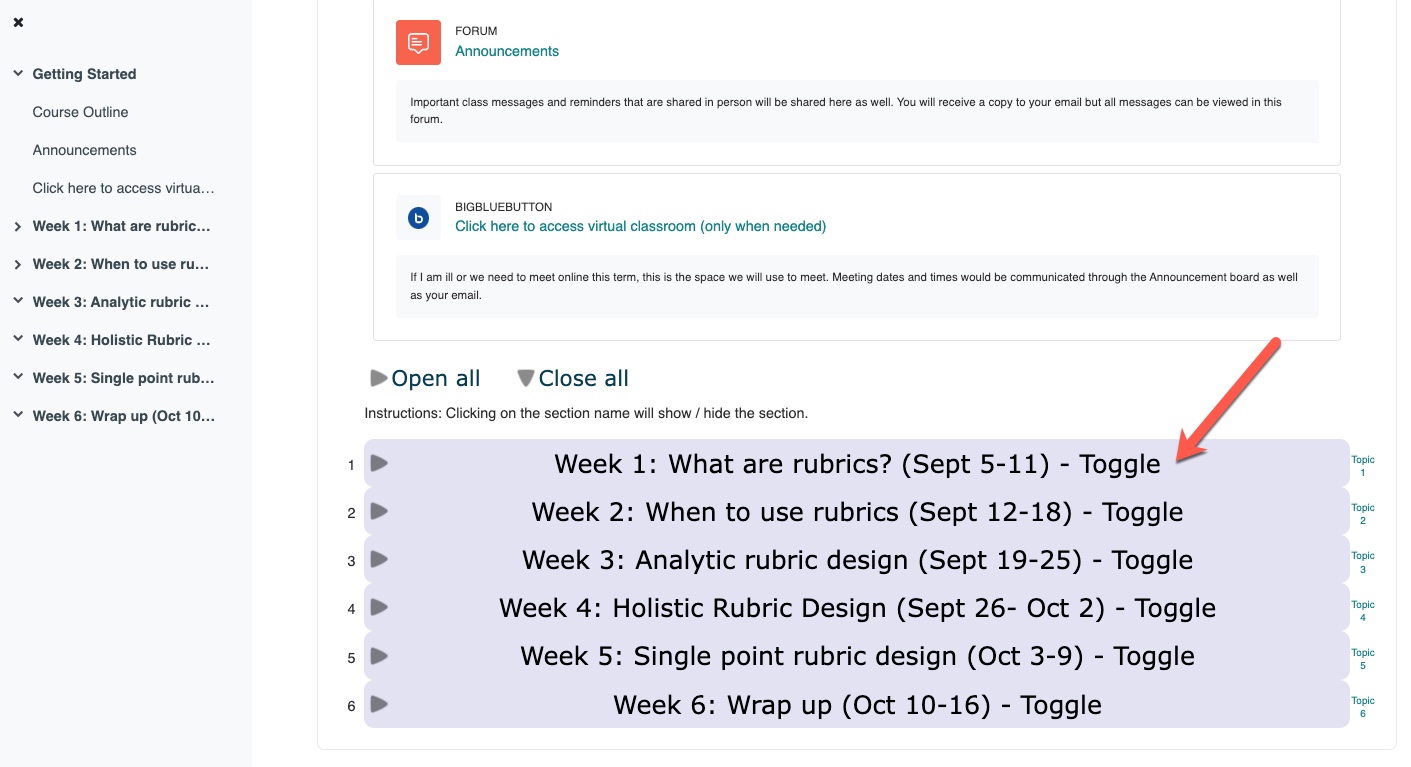
Collapsed Topics Course Format:
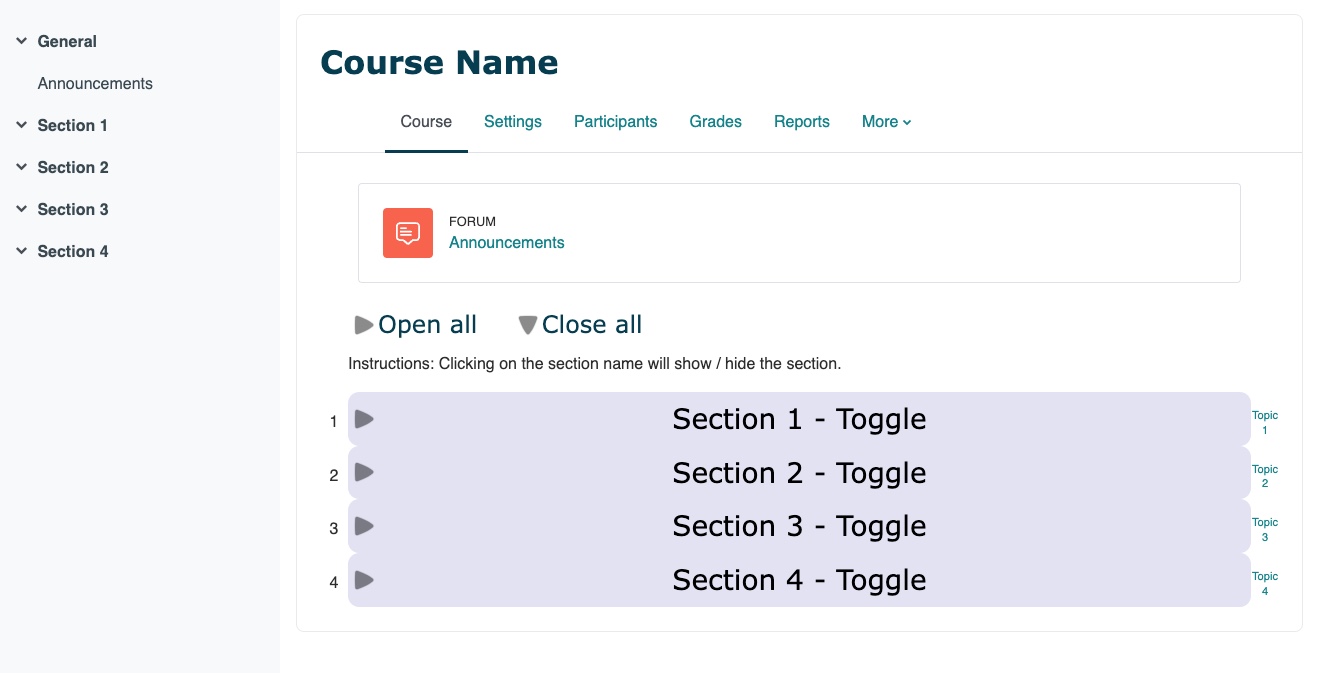
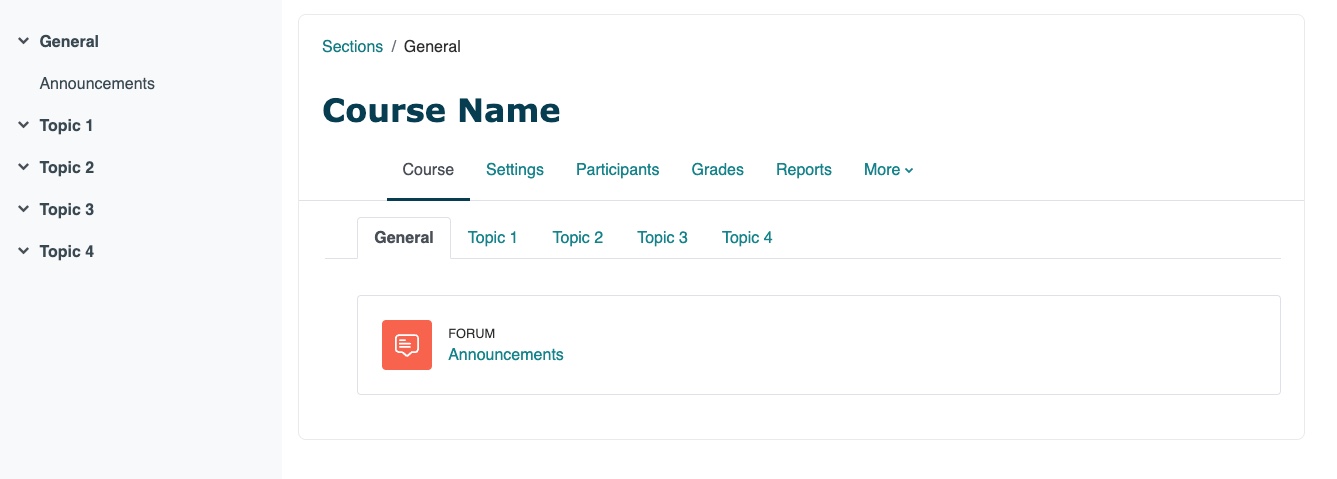
Onetopic Course Format:
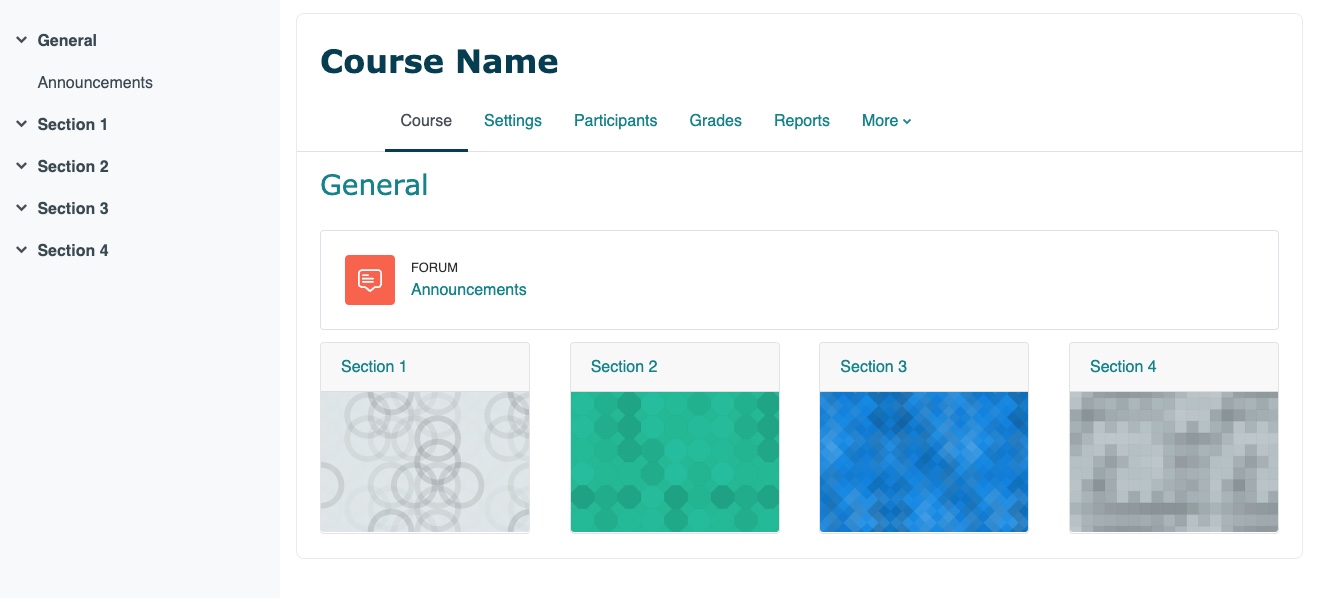
Grid Course Format:
Name: Course Sections
Once you determine how you will structure your course and what Moodle course format you will use, it’s important to create well-crafted titles for each course section (Nilson & Goodson, 2018, p. 40). The goal will be to use brief, clear names and to organize them in a logical and consistent way. This way, although the content will change each week, the structure will stay the same (Nilson & Goodson, 2018, p. 222).
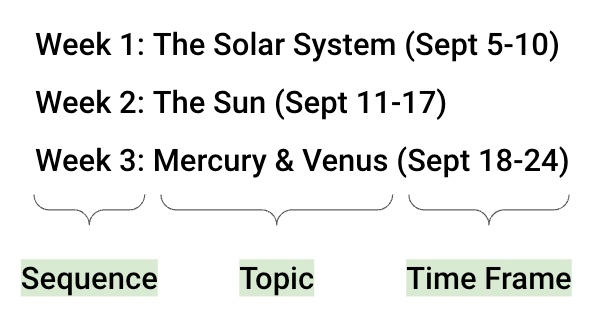
Three elements to consider when naming each section are:
-
Sequence
-
A sequence helps students see an order in which they will be exploring course content. This progression illustrates a successive way to navigate to their content (Week 1, Week 2, Week 3, etc.).
-
However, if used on its own, it conveys nothing about what is being covered in that section or when (the exact dates).
-
-
Topic
-
A topic helps students identify what is being covered in that section.
-
However, if used on its own, it conveys nothing about when that topic is being explored or in what order.
-
-
Time Frame
-
A time frame helps students see when they are exploring course content which simultaneously provides a different kind of order as well. Since courses run on a term schedule, this is very helpful since students can simply look at a calendar, identify exactly where they are in the course, and plan their time accordingly (Nilson & Goodson, 2018, p. 40).
-
However, if used on its own, it conveys nothing about what is being covered in that section.
-
It’s easier for humans to recognize information than it is to recall it from memory (Weinschenk, 2020, p. 57). So, by providing multiple ways for students to recognize what is learned and when, it will help them find what they are looking for more quickly. However, there are different ways to configure your course sections in Moodle depending on your context and the course format you use. That being said, all three of these elements don’t need to exist only in the title, if that doesn’t suit your context. Some can be used to form the titles, while others can exist in the section area.
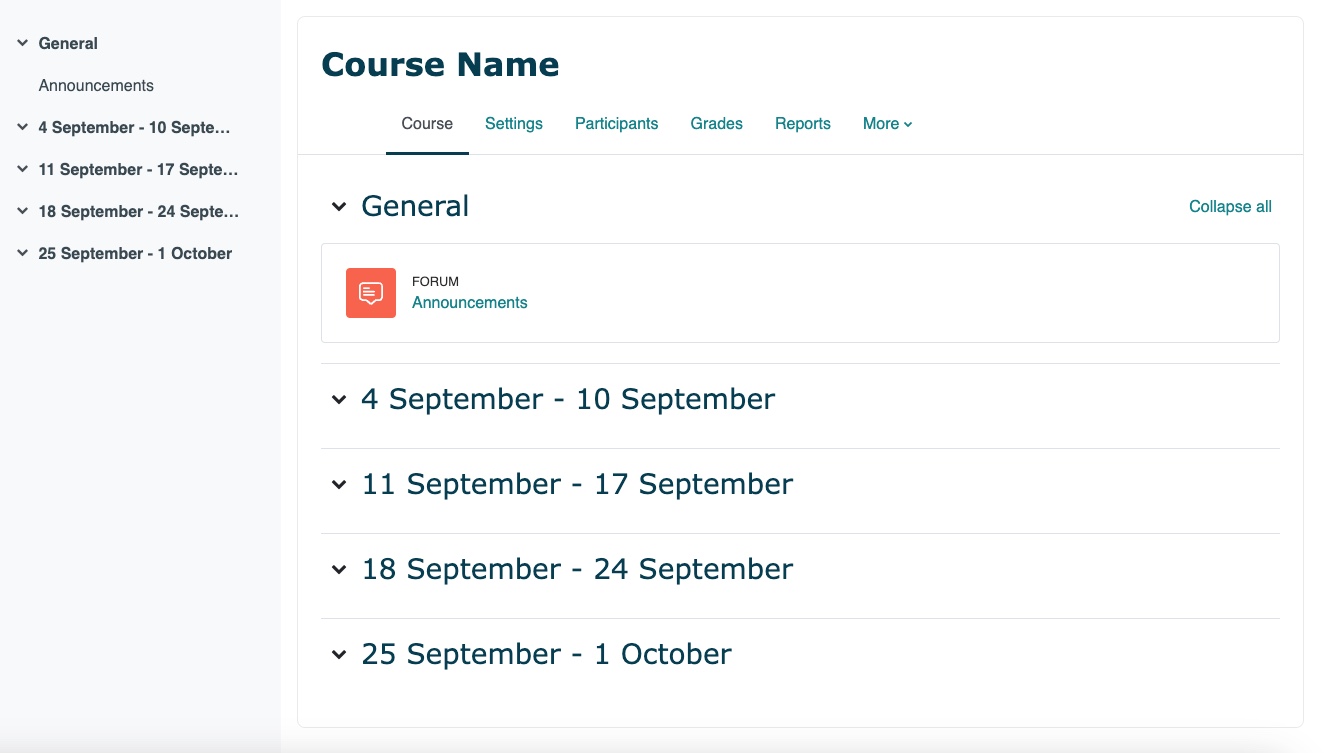
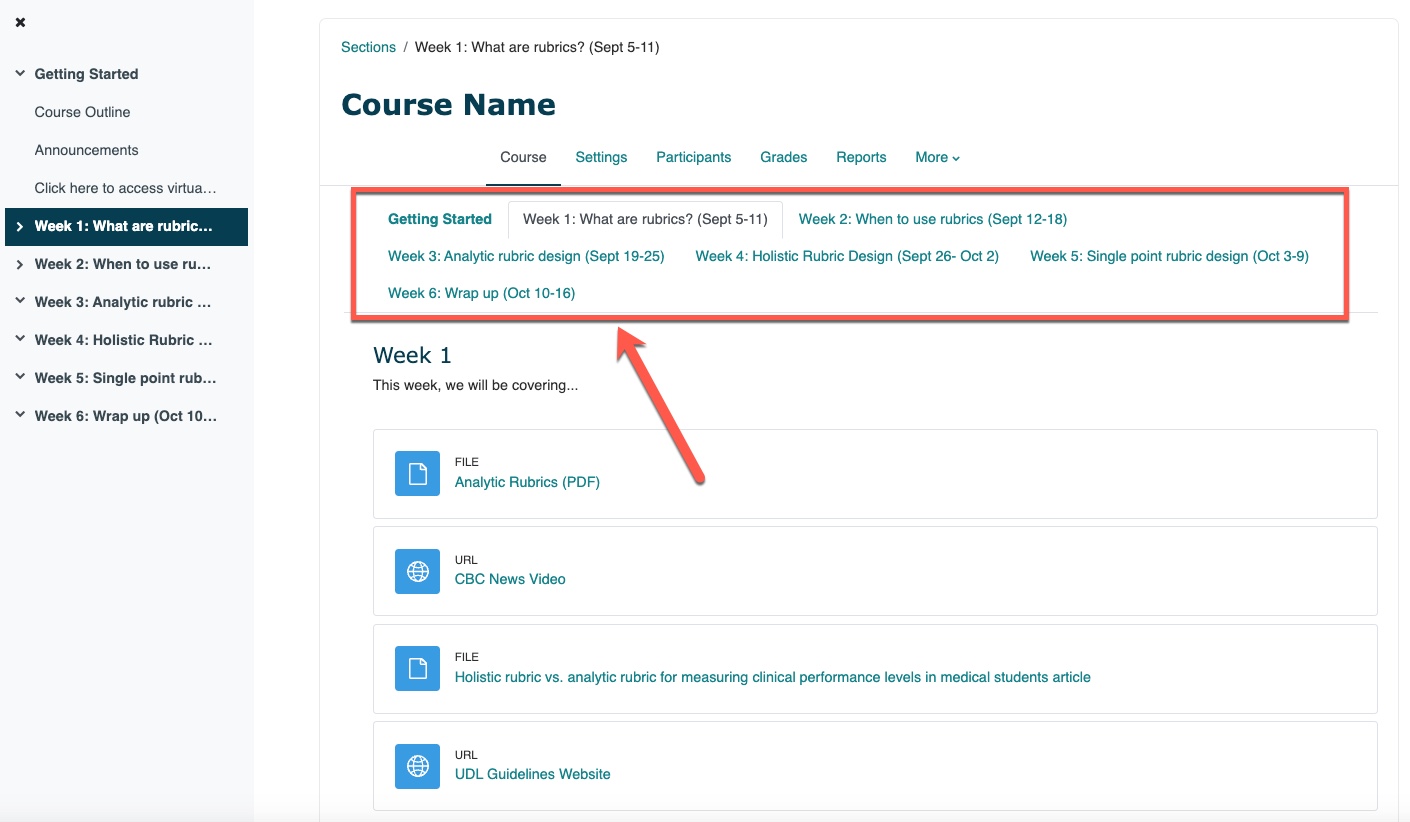
For example, in the Weekly and Collapsed Topics course formats, these Moodle course format styles have the space to accommodate longer names.
Weekly Course Format:
Collapsed Topics Course Format:
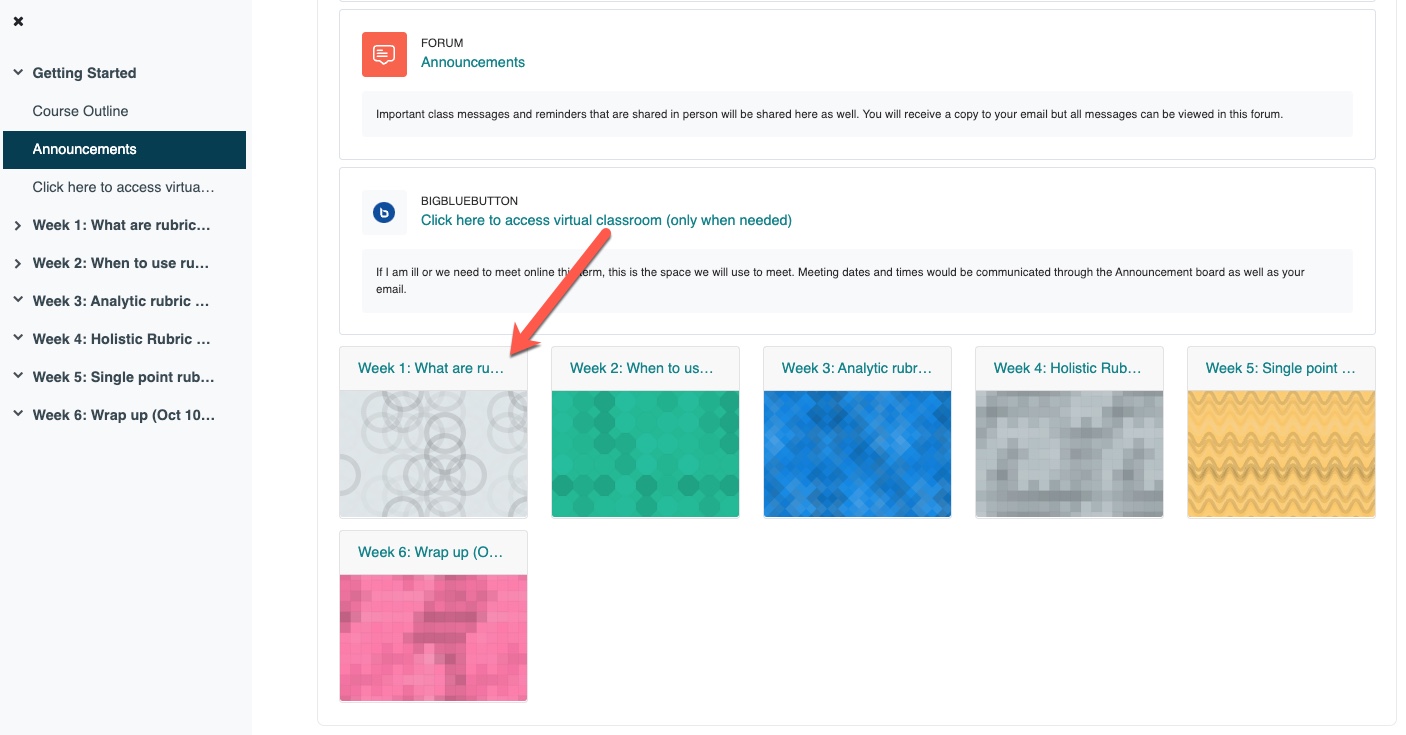
Whereas in the Onetopic and Grid course formats, there is less space for longer names which can make the sections more cluttered or difficult to read.
Onetopic Course Format:
Grid Course Format:
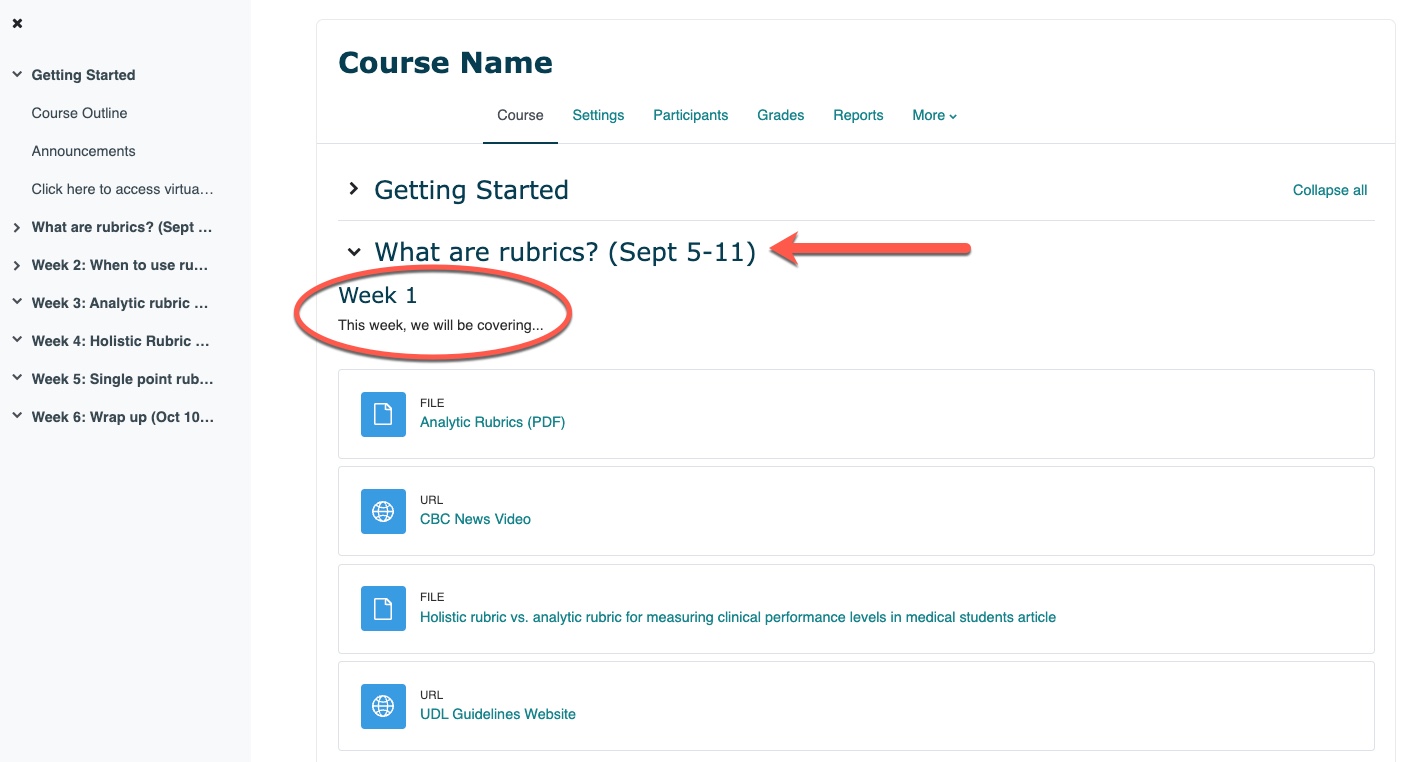
In this case, you would have to determine what naming convention is easiest for students to navigate to the course sections by (sequence, topic, time frame). Then, you can include any additional information in that section which appears at the top before the course content.
For example, the title, “Week 1: What are rubrics? (Sept 5-11)” has been shortened to “What are rubrics? (Sept 5-11)”. Then, when the student clicks on that section, they see the sequence that section aligns with (Week 1) at the top, before the course content. This way, students have all the information they need to determine if they are in the right area.
Topic 2: Home Page
Listen to (or read the transcript of) this topic's introduction:
Topic 2 Introduction Transcript (PDF)
What could I include on the home page?
Did you know?
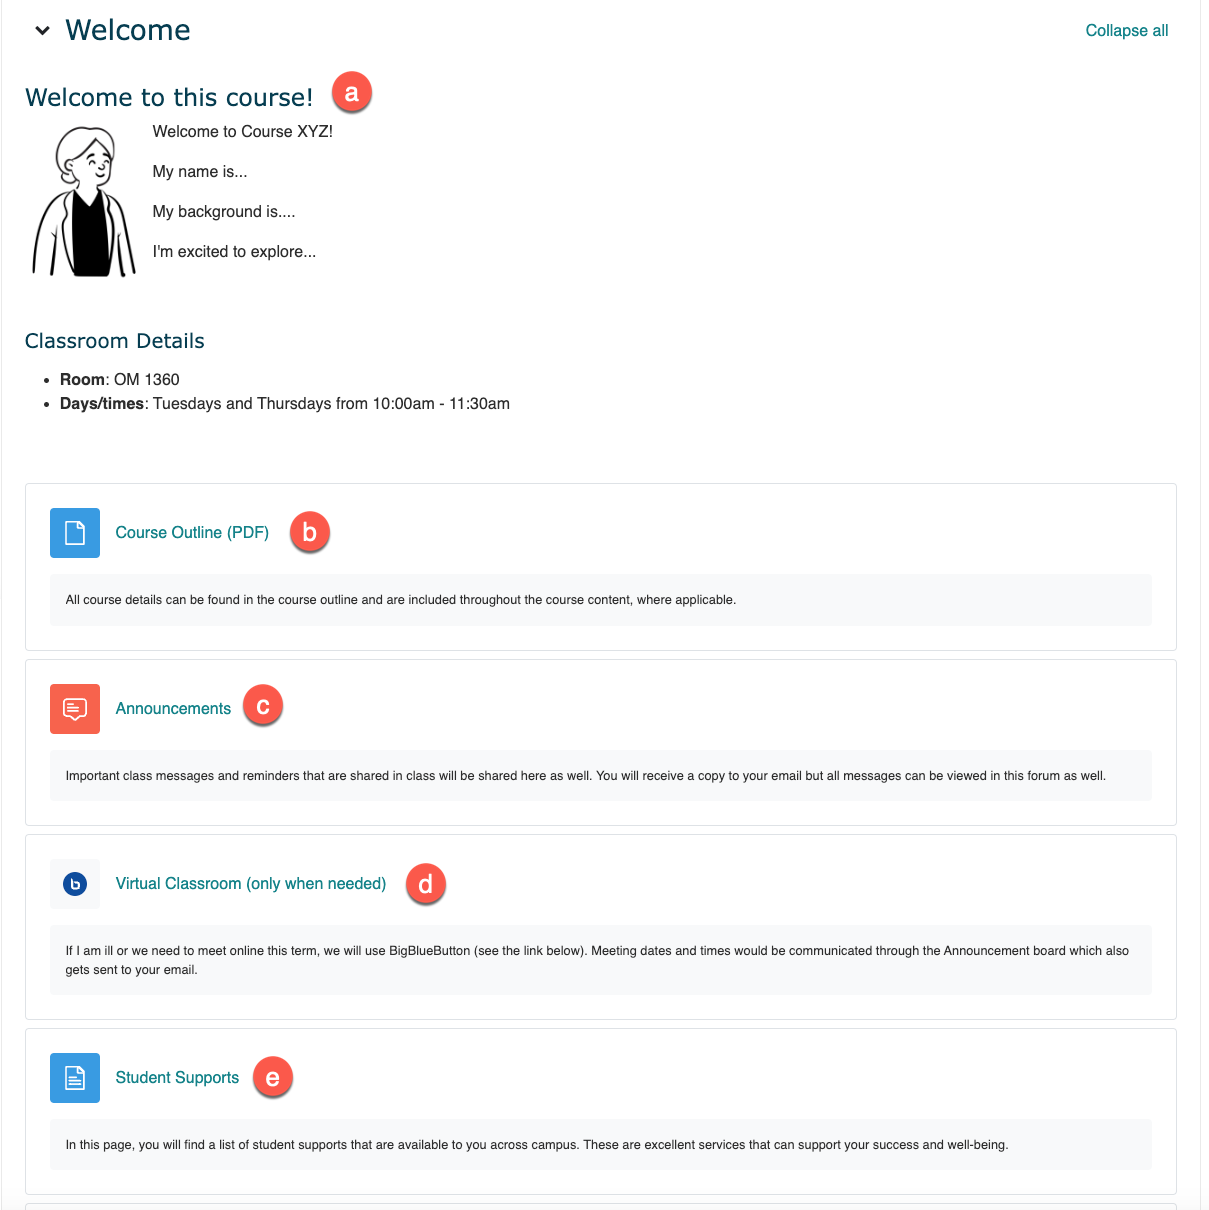
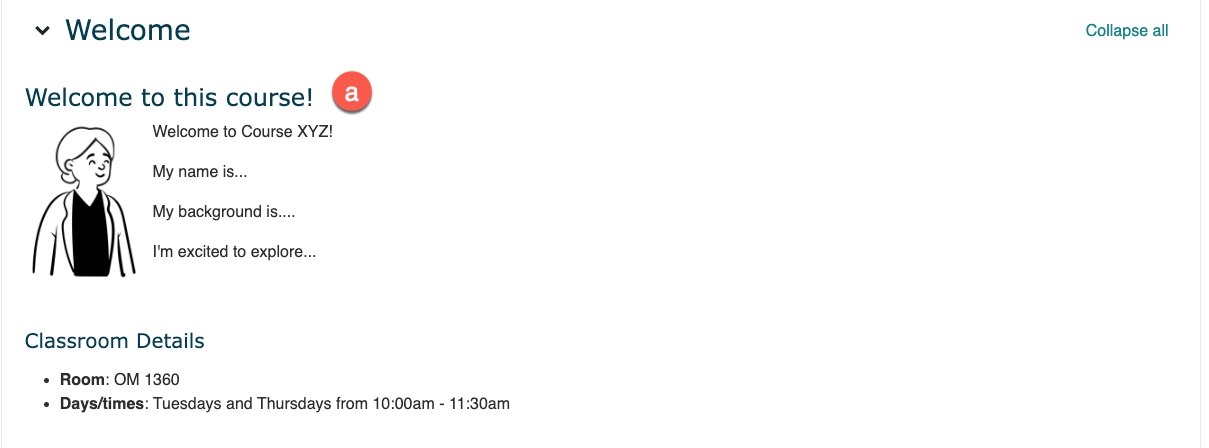
You can change the name of the “General” section to be whatever makes the most sense for your course! Other common examples include “Getting Started” or “Welcome” (Welcome is featured in the example above).
Welcome: Adding Home Page Elements
a) Welcome Message
This is an opportunity to greet your students and provide a brief overview of what will be covered in your class and a bit about you as their instructor. It can be in the form of a text-based message, video, or another creative way to share this information.
Further, you can add other important information students may need such as classroom details.
These thoughtful and intentional details create a warm, welcoming environment for the virtual presence of your course.
b) Course Outline
Providing the course outline in an easy to access location is helpful. In the example, the File tool was used to attach the PDF. Also, a description that is visible from the main page was added to explain what students can find in the course outline. This way, students know what to expect before clicking on the file.

c) Class Communication
In person, instructors provide students with prompts and reminders to keep them on track and progressing. But, how are these messages communicated to students who are absent or if you are absent? Determining an intentional virtual communication strategy will ensure all students are receiving your important messages. Also, having these messages shared in written form can be helpful for English language learners.
For example, using the Announcements forum (which comes with every Moodle course) will send a copy to student emails and a copy lives in the announcement forum. This provides students with two ways to receive and review your important messages.
Also, your virtual communication plan should be shared with students so they know when and where to access these messages. In the example, this was achieved by including a description of the plan that appears on the main page.

d) Virtual Classroom
Having a virtual means to stay connected with students, whether it’s for occasional teaching or for meeting with students one-on-one, is helpful and should be set up right from the start of classes. This can be achieved by providing a link to access a virtual classroom tool, such as BigBlueButton, and a description of how/when students may use that tool, both being visible from the main page. This will save time if something unexpected happens.

e) Student Supports
Sharing key student support services that are available across campus is an excellent way to support student success and well-being. Module 5: Support Services Across Campus shares what supports should be integrated, what supports are available, how to integrate them into your Moodle course shell, and how to talk to students about supports.

What are some other elements you may consider adding in the "home page" section of your Moodle course? What is important for your course that may not have been mentioned here?
Join the Slido Event to type your anonymous response to the prompt above and see a word cloud appear, generated by other colleague's responses in this Module!
If you are unable to access the Slido event at the link above, go to slido.com and enter the participant code: 9287504
Topic 3: Course Content
Your course materials should be made available in Moodle to enhance accessibility. This will allow students to engage with them at their own pace or use assistive technologies to explore them in different formats.
This topic focuses on four aspects of course resources in Moodle:
- Curate: Filter, Collect, Organize, Group
- Organize: Chunk and Section
- Name: Consistent and Informative
- Introduce: Add Context
Curate: Filter, Collect, Organize, Group
When it comes to putting resources in your Moodle course, Gonzalez (2018) asks, are you a curator or a dumper? A curator thoughtfully includes resources and considers where they are placed so they meaningfully impact the learning experience. On the contrary, a dumper includes resources with little consideration of where they are placed or how they impact the overall learning experience.
Human brains do not respond well to dumping as it is often associated with little organization, lack of clarity, and inconsistencies. According to cognitive load theory, the mind has limited capacity to hold information in working memory when it’s processing content. For this reason, it’s critical to organize information in an efficient way to optimize mental processing (Nilson & Goodson, 2018, p. 80).
But, what might curation look like? According to Dirksen (2016), curation could be the ability to:
- filter or identify the really interesting information to present to students
- collect and caption certain pieces of information to help students see how it all fits together
- aggregate relevant resources into a single location for easy access
- organize disparate content around a theme
- group certain elements to provide context (p. 254).
Reflection
When curating resources for your Moodle course(s), be sure to ask yourself questions such as:
-
Are the images I'm including in my course representative of a variety of cultures?
-
Are the articles/readings I'm including in my course being told from a single perspective or multiple perspectives?
-
Are there opportunities for students to see themselves represented in the curriculum I’m presenting?
Asking yourself questions like these will help critique and challenge western world views (Cummins, Hu, Markus, & Kristiina Montero, 2015, p. 565). When course resources are selectively curated to reflect human diversity, it helps students feel like they belong.
Organize: Chunk and Section
Using your course structure plan from Topic 1 and curation skills, determine which resources are necessary for students to engage with to achieve the learning outcomes and which ones are additional resources that can be explored when time and
interest permits.
Once you've determined that, it's important to think about how the resources will be organized. Students learn new material better and can remember it longer when it’s received in an organized way that is chunked into categories or logical groups (Nilson & Goodson, 2018, p. 81). This is further strengthened by placing the materials in the order students should review them. So, within each week or section of your course, place required resources first and follow them with optional resources that students explore when time and interest permits (where applicable).
Tip!
Be sure to clearly name additional resources as optional to help students manage their time and cognitive load.
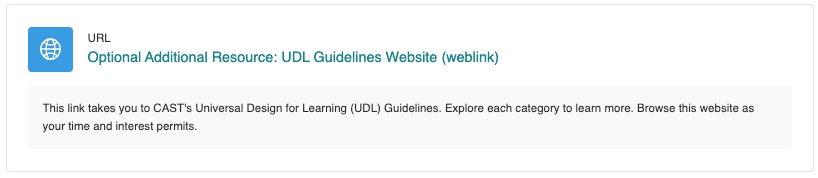
In the example below, the website resource is clearly marked as an "Optional Additional Resource" and students are encouraged to explore it as their time and interest permits. This way, it encourages students to assess their current level of learning and provides them with choice about whether or not to engage with it.
Name: Consistent and Informative
How you name your course resources is just as important as including the resources themselves! If they are inconsistently named, and vary from section to section, this makes it difficult for students to identify and locate them. This creates unnecessary mental processing that is draining.
When naming course resources, consider including the:
-
Type of resource
-
Topic
-
File type
Let’s expand upon this further:
-
Type of resource (Is it an article? Textbook pages to read? A video?). The type of resource can be imagined a few different ways:
-
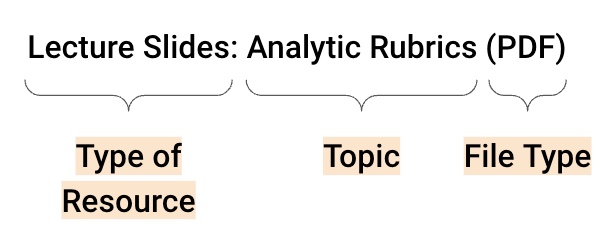
The resources can be categorized by a descriptive word that illustrates the type of resource it is (e.g. slides, article, video, etc.). For example:
-
Slides: Analytic Rubrics (PDF)
-
Video: CBC News Student Evaluation (4:31) (weblink)
-
Article: Holistic rubric vs. analytic rubric for measuring clinical performance levels in medical students (PDF)
-
Optional Additional Resource: UDL Guidelines Website (weblink)
-
-
The resources can begin with an action word (e.g. Read, Do, View, Watch, etc.). For example:
-
View: Analytic Rubric Slides (PDF)
-
Watch: CBC News Student Evaluation Video (4:31) (weblink)
-
Read: Holistic rubric vs. analytic rubric for measuring clinical performance levels in medical students article (PDF)
-
Optional Read: UDL Guidelines Website (weblink)
-
-
The resource topic can be described first with the type of resource and file type described at the end. For example:
-
Analytic Rubric Slides (PDF)
-
CBC News Student Evaluation Video (4:31) (weblink)
-
Holistic rubric vs. analytic rubric for measuring clinical performance levels in medical students article (PDF)
-
UDL Guidelines Website (weblink) [optional]
-
-
-
Topic/Theme (What is the resource about?)
-
Providing a bit of context helps students understand what is being covered in that resource. This may be the title of the resource itself or a more broad theme/topic that represents what the resource is about.
-
-
File Type (Is it a PDF? Word Document? PPT Slides? Weblink?)
-
Knowing what file type the resource is allows students to understand how it will open on their device. For example, a PDF will open in the browser whereas a PowerPoint file would require Microsoft PowerPoint or similar to open it. The latter (PowerPoint file) may create a barrier for those who do not have that software installed on their device. PDFs are often considered a universal file type since they open easily across multiple devices.
-
By creating descriptive names for course resources, it provides students with the important information - what type of resource, what it’s about, and what file type it is - before they even click on the resource link.
Activity
In the activity below, drag the vertical bar in the middle of the screen to see two approaches to naming course resources:
- When you drag the bar to the right, the image features resources with less descriptive titles
- When you drag the bar to the left, the image features the same resources but with more descriptive titles and additional context
From the student perspective, which resources are clearer and more informative?
(Refresh your screen if the window below is displaying small)
Introduce: Add Context
In the classroom, you likely don’t hand students an article to read and say nothing about it. You might share what it’s about, what themes to focus on, and perhaps even ask a question you want students to answer after reading it.
This kind of context is beneficial to add in your Moodle course when students are accessing the course materials outside of class. Avoid assuming students will remember what was said about the resource in class and instead, provide the information and context students need (Weinschenk, 2020, p. 64). This will benefit all students, including those who were absent, English language learners, and those who benefit from text-based guidance or instructions.
Where relevant, introduce the resource with brief information that shares things like what it’s about, what they should focus on, or how to interact with it. This will help students focus their attention, make connections to what they already know, and help them manage their time.
In Moodle, this may look something like:
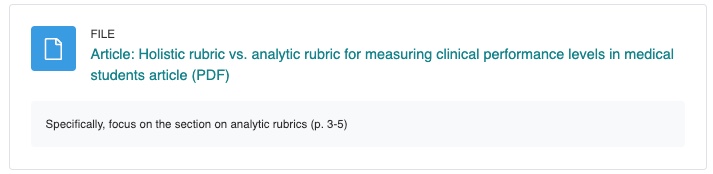
The above example includes the type of resource (article), what the topic is (holistic vs. analytic rubrics), file type (PDF), and a short description of what to focus on (p. 3-5). This informative information helps students understand what to expect when they click the link.
Topic 4: Assessments
Students often begin their assessments outside of the classroom- they may begin a project, draft an essay, or study for a quiz. Regardless of whether your assessments occur in person or online, assessment details should be provided in your Moodle course for greater access.
This topic focuses on three aspects of assessments in Moodle:
- Name: Consistent and Informative
- Describe: Clear Instructions
- Organize: Helpful Locations
Name: Consistent and Informative
Just like with course resources, purposefully naming your assessments and using that naming convention consistently (inside and outside of class) will support efficient navigation.
When naming an assessment, consider including details such as the:
-
Assessment type (ePortfolio, quiz, presentation, essay, project)
-
Sequence of assessment, if applicable (Quiz 1, Quiz 2)
-
- Name/theme of assessment (Showcase of Work, Mitochondria, Where do we belong?)
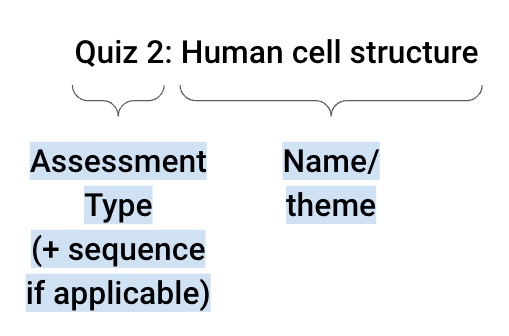
These elements can be combined in various forms. For example, each of the assessment names below are followed by a component breakdown:
-
Showcase of Work (ePorfolio) = name/theme + type
-
Quiz 3: Mitochondia = type + sequence + name/theme
-
Group Presentation - Where do we belong? = type + name/theme
-
Assignment 1: Comparing types of flora (group project) = sequence + name/theme + type
Drag the assessment titles on the right into the "Clear and Descriptive Assessment Names" box or the "Unclear and Vague Assessment Names" box.
(Refresh your screen if the window below is displaying small)
Describe: Clear Instructions
Once you've determined a naming convention, make the assessment criteria explicit and specific (Nilson & Goodson, 2018, p. 144). This allows students to spend their effort on completing the assessment rather than on searching for the expectations.
There are a variety of strategies and locations to include assessment information, so it depends on how your course is designed and what your student needs are. As long as you provide students with information when they need it and clear instructions of where things can be found, students can remain focused on learning.
Some key details to provide students with include:
-
Purpose of the assessment (how this assessment connects to the learning outcomes, what learning they are practicing and demonstrating)
-
Assessment instructions (define key steps using number or bullet points)
-
Grading details (marks it’s out of, how it’s weighted in the overall course)
-
Marking criteria (rubrics, performance criteria, checklists)
-
Due date
-
Submission instructions (upload a document, create a discussion post, embed a video using Kaltura)
-
If it’s a quiz, what kinds of questions they can expect (15 multiple choice questions, 2 short answer, etc.)
Online Moodle Assessments
If you use Moodle tools (Assignments, Quizzes, Discussion Boards, etc.), including assessment information right in the tool they are using to complete the assessment makes the information easy to find at the time of need.
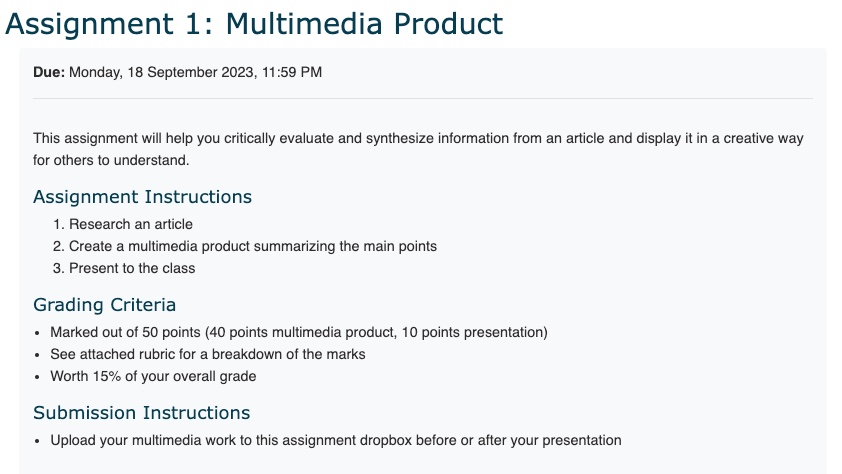
Using the Assignment tool as an example, the following is a sample of what students would see from the main course page:

Then, when students click on the assignment name, this is an example of what they would see. It contains all important assignment information that is neatly organized. Using headings and bulleted lists clearly organizes the assessment details and makes it easier for students to process the expectations.
Did you know? (Connection to gradebook)
If you are using a Moodle Tool to grade assessments (e.g. an Assignment dropbox for students to submit work to, a Moodle quiz, etc.), a space will automatically be created in the gradebook to receive student marks. This way, when you mark the submissions, student grades are automatically input into the gradebook.
In Person Assessments
If you don’t use Moodle tools, or your assessments occur in person, you should still include information about the assessments in your Moodle course. This way, when students are beginning their assessment outside of the classroom, they have information they can refer to.
A streamlined way to achieve this is to use the Assignment Tool, with the submission options turned off. This means students won't be able to submit anything to the dropbox, but you can still assign them a grade in this tool.
If you want to explore additional options, here are examples of ways you can include assessment information in Moodle:
-
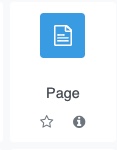
Use Moodle Pages if you want to display all information in a separate space that students access when they click the page title. You also have the option to create a separate/secondary message for the main course page, if desired.
-
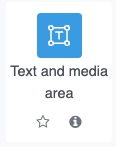
Use Moodle Text and media area to display all information on the main course page.
-
Use Moodle Files to attach a PDF and include a secondary message that appears on the main course page, as needed.
To see how these tools function for students, watch the following screen recording video (1:29):
Did you know? (Connection to gradebook)
If you want to manually input student grades for in person assessments in Moodle (e.g. in person exam, presentations, participation, etc.), a “grade item” will need to be created in the gradebook. Then, grades can be manually entered directly into the gradebook for in person assessments.
Lastly, when all your assignments are created in your Moodle course and any additional grade items are created in the gradebook, you can set up your course weighting, as needed.
Organize: Helpful Locations
Organizing your Moodle course effectively can provide students with multiple pathways to navigate to their assessments. This creates an accessible experience that considers different student needs. Two common strategies for organizing assessments in your Moodle course are by week/section and by category.
Week/Section
Using your course structure plan from Topic 1, this will give you insight into what week/section of your course assessments should be placed in. Assessments are often placed in the week/section where it is due so students can see where it's situated in the grand scheme of your course. Then, to help students manage their time, reminders about when to start the assessment can be shared as:
- verbal messages in class
- text-based or video-based messages shared virtually through an announcement
- text-based reminders in the week/section where students should begin working on their assessment (using Moodle's "text and media area" tool, for example)
Category (if Moodle assessment tools are used)
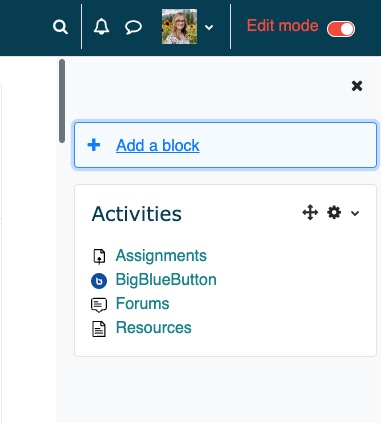
If you use Moodle tools to create online assessments, you can set up an Activities block to organize Moodle assessments into the types of assessments that exist in your course (i.e. Quizzes, Forums, Assignments, etc.). This provides an alternative way for students to navigate to their assessments.
To set this up in your Moodle course:
- Open the block drawer on the right hand side of your screen
- Click "Add a block"
- Select the "Activities" block from the list. The Activities block will now appear in the block drawer.
Conclusion
Reimagining your Use of Moodle
Your Moodle course is a space to make course elements available online and include relevant information in an organized way. This allows students to set goals, manage their time, and monitor their progress outside of the classroom (CAST, 2018).
We hope this module has you thinking about ways you can effectively and strategically organize a Moodle course to optimize navigation. This way, it transforms Moodle from being merely a place to store course resources and house student grades to a foundational space that students can effectively learn within outside of class and that you can draw upon during class.
Module 2 Assessment
To complete this Module as a component towards earning the certificate, please choose one of the assessment options below and share your response in the Module 2 Discussion Forum. We encourage you to engage with your colleagues and respond to their posts to learn about different ways Moodle is being utilized in different contexts.Assessment Option 1
Reflect on your current Moodle course organization. Choose at least one area (home page, course menu, course content, assessments) that could be adjusted to enhance student navigation. In your reflection, please:
- Describe your current organization strategy
- Describe the revisions you would make to enhance navigation and learner-centeredness (drawing from the module content)
- Explain why those revisions would be made. How does it impact students?
Assessment Option 2
- Describe how at least one area of your Moodle course (home page, course menu, course content, assessments) already implements organizational practices shared in this module
- Identify additional organizational strategies you would integrate into your course, moving forward.
- Describe how the current organizational strategies benefit students and why you would make additional changes.
Assessment Option 3
- How do you or might you use Moodle in your context?
- In general, how do the organizational practices shared in this module apply to your context?
- To enhance navigation and learner-centeredness in your setting, what organizational practices do you currently integrate? What additional organizational practices (learned about in this module) would you consider implementing?