Moodle Course Design - What's Possible? (enrolment key: moodle)
Section outline
-
Experience what's possible in Moodle through the lens of a student! This resource is designed to help you make strategic, informed decisions around choosing Moodle tools while considering the student learning experience. It aims to connect learning design principles with Moodle tools and their function that can be applied within your context.
Please note: The different Moodle activities and resources are referred to as "tools" in this resource since they function as tools to achieve a desired outcome.

This resource is organized into a series of headings, based on the types of content commonly included in a Moodle course:
- Files (PDF, Word, PowerPoint)
- Organizing Multiple Files or Pieces of Information
- Text-Based Information
- Hyperlinks
- Images
- Audio
- Video
- Assessments
- Quizzes
Within each section, you will explore different strategies for including that type of content in your Moodle course.
Happy browsing! If you have any questions, please connect with moodlesupport@tru.ca -
Below are examples of how the Moodle File tool can be used to attach PDFs, Word Documents, and PowerPoint files. You may notice that in some cases, the same tool is used but the function is different. When selecting a tool to use, be sure to understand how it functions and consider how it impacts the student experience.
Key features and considerations for the File tool:
- It can be set to open in a new browser tab, the same browser tab, or to download the file (each has its own experience, depending which device students are using)
- You can add a brief message that can appear on the main course page. This is great for adding additional context about the file (what students should focus on, a question they may reflect on, details about which pages to read, etc.)
- Including information about the file type (.pdf, .docx, etc.) and how it will display (open in a new browser tab, download, etc.) before students access the file helps build an inclusive environment.
-
Having the file open in the same browser tab makes it easy for students to navigate on a mobile device, laptop, or computer. This way, simply clicking the browser's back arrow will return them to the course when they are done reading the file.
-
Having the file open in a new browser tab allows students to simply close the browser tab when they are finished reading the file to return to their course. However, this action may be less user-friendly on mobile devices since they have to navigate away from the course to view the file.
-
The File tool can be set to automatically download when the title is clicked by students. This might be helpful for those who want the file to edit on their laptop or computer, but downloaded files may be difficult for students to find or open if they are on a mobile device.
-
The File tool can be set to automatically download when the title is clicked by students. This might be helpful for those who want the file to edit on their laptop or computer, but downloaded files may be difficult for students to find or open if they are on a mobile device.
-
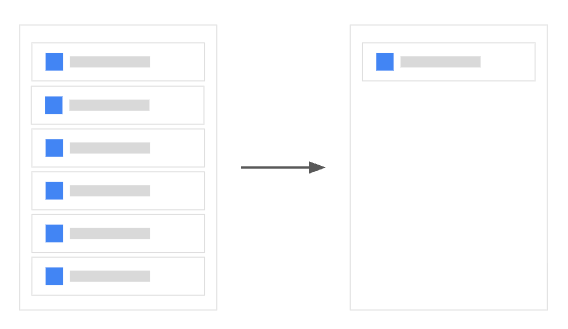
Attaching a series of files through individual File tools can add significant length to the course for students to scroll through. Alternatively, you can use the Moodle Folder tool to organize related files into a single space.
-
In this example, folder contents are displayed "on a separate page" meaning students need to click the title of the folder to access the files within it.
This description will appear above the series of files that have been uploaded. You can also add hyperlinks in this section, if desired.You can check the "force download of files" box which means when students click on the file, it will be downloaded. This is helpful for files that students need to edit. Alternatively, if you don't select that checkbox and upload all PDF files, they will open in the same browser tab which is better suited for viewing.
Click the different files in the folder to explore how they would open for students (which depends on their file type).
-
Folder Tool (shown inline)
In this example, folder contents are displayed "inline on a course page" meaning students can access the files from the main Moodle page. The name of the Folder Tool doesn't display so you might want to add a title like is done here - Folder Tool (shown inline).
You can also add hyperlinks in this section, if desired.
Click the different files below to explore how they would open for students (which depends on their file type).-
Folder Tool (shown inline)
-
-
-
There are a few ways to add text-based information in Moodle, depending on how you want it to display and function.
Common Moodle tools are:
- Text and media area which displays on the main course page (useful for short, key pieces of information)
- Page tool which displays after clicking on the title (useful for longer information)
- Book tool which displays multiple pages of information (useful for organizing a series of related information)
Within any of these tools, additional media like links, images, videos, etc. can be added too.-
When using the Page tool, you have the option to add a brief description which appears on the main course page. Then, students will need to click on the title of this item to access the main page content.
-
The Moodle Book tool can be used to organize different types of related resources across separate pages, to function like a book.

When you open the book, be sure to open the secondary menu navigation on the right side of the page.
This provides a different way to navigate through the pages, in addition to the next and previous buttons.
Students can download or print chapters of the book. However, keep in mind that for certain media (e.g. embedded videos) they won't appear in a downloaded book so a hyperlink to the video would need to be included too.
-
Hyperlinking to content can happen using a few different tools, depending on how you want it to function for students. Explore the examples below!
Tip: Wherever you see a text editor in Moodle, a hyperlink can be added using the Link icon.
-
In the URL tool settings, you can determine how the URL opens (in the same browser tab, new tab, etc.). This one is set to open in a new browser tab.
If the URL takes students to a website that they have to explore, setting the URL to open in a new tab can be helpful since students can close it when they are done browsing to return to their Moodle course.
-
In the URL tool settings, you can determine how the URL opens (in the same browser tab, new tab, etc.). This one is set to open in the same tab.
If the URL takes them to a website that they have to explore, setting the URL to open in the same tab can lead to student frustration since students will have to click the browser's back button numerous times to return to their Moodle course. Or, they will have to close the tab, open a new one, and navigate back to their Moodle course which adds extra unnecessary steps.
-
With the Page tool, you can add a brief description that can appear on the main course page (like you see now).
Then, the URLs and additional content are added in the page content. Students will need to click on the title of this item to access the page content.
-
-
You can add images to a variety of tools using the "insert of edit image" icon.

Explore the examples below that illustrate ways to add a single or multiple images.
-
Text and Media Area Tool
Using the Text and Media area tool, you can have a picture display on the main course page using the insert/edit image button .
. Remember to include Alternative Text for images included in your course so in case they don't display or for students using screen readers, they are able to understand what the image is about.
-
-
Below are examples of how the same audio file can be added to your Moodle course in different ways. As you will notice, depending on the tool or strategy used, it results in different outcomes for the students. When deciding how to add audio to your course, be sure to understand how the tool functions and consider how it impacts the student experience.
-
Text and Media Area Tool (using Kaltura, if available at your institution)
If Kaltura is available at your institution, an audio file could be embedded using the Kaltura button
 in a Text and Media tool. It would display on the main course page and contain captions (be sure to edit them!).
 -
In this example, the audio file itself is uploaded using the File tool. It does not contain captions so if you choose this tool, you might consider including a transcript below. For example, you may use a separate File Tool or create a hyperlink to the transcript in this description area.
-
Text and Media Area Tool (audio file)
In this example, an audio file has been embedded using the link button in the Text and Media Area tool.
As you can see, there are no captions so you might want to consider including a transcript!
-
-
There are a variety of ways to add videos in your course, depending on how the video exists.
Helpful information to include alongside the video is:
- Length of video (e.g. 5 minutes)
- Context that briefly introduces the video (ie. describe why the video is important, how it connects to the learning outcomes, etc.)
-
Text and Media Tool (embedding a video, option 1)
In this example, the embed code was copied from YouTube and then pasted using the HTML button.
It automatically embeds the video and captions are included in the video player.
-
Text and Media Tool (embedding a video, option 2)
In this example, a URL was entered using the "Insert or edit an audio/video file" button
It automatically embeds the video but no captions are included in the video player.
-
In this example, the URL tool is used to hyperlink the video to the source (YouTube) which is set to open in a new browser tab. Sending the student outside of Moodle can potentially be a source of distraction if they continue to watch other videos on YouTube. However, they can quickly return to Moodle by either closing the tab or clicking the browser's back button (depending on how it opened).
-
In this example, students click the Page title to be taken to a space where the video displays. While it is a second click to get there, they only have to click the browswers back button to return to the course.
-
Assignment activities automatically display in the gradebook when added to your course.
Depending on how the assignment is set up, students can submit their work by:
- Typing directly into Moodle
- Submitting a file
- Embedding a Kaltura video or audio file (if Kaltura is available at your institution)
In the Assignment settings, instructions can be added directly into the description box or uploaded as an attached file.
-
Opened: Thursday, 8 June 2023, 12:00 AM
An assignment dropbox can be set up to accept a file attachment. It can accept any file type or can you limit it to certain file types.
The "file submission" submission type needs to be checked off in the assignment settings:

-
Opened: Thursday, 8 June 2023, 12:00 AM
An assignment dropbox can be set up to accept only written text input by the student. This includes if students are hyperlinking to their assignment.
The "online text" submission type needs to be checked off in the assignment settings:

-
Opened: Thursday, 8 June 2023, 12:00 AM
An assignment dropbox can be set up to accept both file attachment and written text input by the student. If your students might be uploading a variety of assessment styles (written text, hyperlink, file attachment), this is the most universal approach.
Both the "online text" and "file submissions" submission type needs to be checked off in the assignment settings:

-
This assignment dropbox features a built in Marking Guide. It helps to set expectations for students and is used to mark student work (a value is typed in alongside the criteria).
-
This assignment dropbox features a built in Rubric. It helps to set expectations for students and is used to mark student work (a value for each rubric row is selected)
-
Opened: Thursday, 7 December 2023, 12:00 AM
An assignment dropbox can be set up to serve as a space in your gradebook where you can input grades and feedback, but it doesn't accept student submissions.
This is useful for in person assignments since it acts as a space to include assignment instructions in your course content but still gives you a place to assign marks to students.
-
- The Assignment tool will accept Kaltura videos or audio too, if Kaltura is available at your institution. In the assignment settings, the "online text" submission type will need to be checked off. Then, students simply click the Kaltura button
 that is embedded in the text editor to embed their video or audio.
 - Note: If all students are submitting Kaltura videos or audio, the Kaltura Media Assignment tool can be used instead.
- Note: If all students are submitting Kaltura videos or audio, the Kaltura Media Assignment tool can be used instead.
- Assignments can also be timed. This might be suitable for timed in class writing samples or used in place of a written quiz. Enable the "time limit" feature in the settings and set the desired time:

- Assignments can be set up to receive submissions from groups of students. When set up correctly, only 1 student needs to submit their work on behalf of their group members. Then, when you mark one student from the group, the mark gets applied to all students in the group. This involves setting up Groups and/or Groupings first.
- The Assignment tool will accept Kaltura videos or audio too, if Kaltura is available at your institution. In the assignment settings, the "online text" submission type will need to be checked off. Then, students simply click the Kaltura button
-
The Moodle Quiz tool can be used for formative or summative quizzes, exams, and self-tests. It features several question types, some of which are automatically machine marked while others require manual grading. Quiz activities automatically display in the gradebook when added to your course.
Consider utilizing the question bank and categorizing and organizing it for each quiz.
Quizzes feature delivery options such as:
- Randomly choose a question for each student based on a set of equivalent alternates
- Randomizing responses for each student
- Display all questions at once, or one at a time
-
Opened: Saturday, 1 March 2025, 12:00 AMThis quiz features different styles of quiz questions available in Moodle, originally created by the TRU Open Learning Media & Production Team.